Author Topic: Queen Alia International Airport - Foster + Partners  (Read 9102 times)

2016-04-12, 22:24:25

Neb

  • Active Users
  • **
  • Posts: 67
    • View Profile
    • RealPolygons
Hi there!


I would like to introduce my latest work. This is the second project made in Corona and this time after a first test https://forum.corona-renderer.com/index.php/topic,11355.0.html I made something bigger and I focused on strong postproduction workflow. Corona multi-pass channels give very efficient way to make a lot of work in postproduction. I mean that range of passes make possible to create flexible way to adapt further 2d operations after a render stage. I made this scene with Cinema R15 Prime and Corona A5. Project: Queen Alia Airport - Foster + Partners, Amman, Jordan ( if there ever rains... ? :) ), postpro Photoshop.

Thank you for watching!

Regards
Marcin "Neb" Jastrzebski
www.realpolygons.com


RAW render


multi-pass

« Last Edit: 2016-04-12, 23:59:14 by Neb »

2016-04-13, 02:41:12
Reply #1

Rhodesy

  • Active Users
  • **
  • Posts: 553
    • View Profile
Fantastic image and fascinating to see the raw and passes. Thanks for posting that bit. I love the mood. I wouldnt have guessed you added the road tex in post. Did you just distort a bunch of tarmac textures then add the road markings?

Nice to see you've done it in C4D too.

EDIT: Just checked out your blog and there is some amazing stuff on there. Congrats! Are you looking to move to corona full time do you think?
« Last Edit: 2016-04-13, 03:24:35 by Rhodesy »

2016-04-13, 05:34:08
Reply #2

philippelamoureux

  • Active Users
  • **
  • Posts: 218
    • View Profile
Nice to see big scale exterior scenes! Very well done.

2016-04-13, 09:36:14
Reply #3

romullus

  • Global Moderator
  • Active Users
  • ****
  • Posts: 8898
  • Let's move this topic, shall we?
    • View Profile
    • My Models
Wonderful post-work. Would love to learn how that normal shading pass can be used in post.
I'm not Corona Team member. Everything i say, is my personal opinion only.
My Models | My Videos | My Pictures

2016-04-13, 10:34:09
Reply #4

Juraj

  • Active Users
  • **
  • Posts: 4773
    • View Profile
    • studio website
Looks great :- ) Your typical detail attention is so cool.


Wonderful post-work. Would love to learn how that normal shading pass can be used in post.

Mask for enhancing direction-oriented effects ? Light, shadows,etc. I've seen Adam Hotovy use it this way long time ago.
Please follow my new Instagram for latest projects, tips&tricks, short video tutorials and free models
Behance  Probably best updated portfolio of my work
lysfaere.com Please check the new stuff!

2016-04-13, 11:10:22
Reply #5

Neb

  • Active Users
  • **
  • Posts: 67
    • View Profile
    • RealPolygons
Thank you for nice comments! I'll post more stuff today to answer your questions. For the normal shading pass as Juraj said. It's very effective way to improove a lights and shadows for example. Just use select by color range option in photoshop, pick right area in the render normal pass and by this way you can select very smooth directionally oriented areas of your image and edit them. It works fine and without complications.
Juraj your typical detail attention is also cool :) I'm a fan of your detailed clean renders. Thanks!

2016-04-13, 16:20:32
Reply #6

berdus

  • Active Users
  • **
  • Posts: 55
    • View Profile

2016-04-14, 18:08:19
Reply #7

yagi

  • Active Users
  • **
  • Posts: 370
    • View Profile
you have miraculous post editing skills. nice job n thanks for posting the raw image, now i know i still have a long way to go with my post production.

2016-04-15, 00:01:22
Reply #8

Neb

  • Active Users
  • **
  • Posts: 67
    • View Profile
    • RealPolygons
Thank you for next nice comments and Corona Team for introducing my work on Corona official FB page! :)
I'm sorry for a delay in my response. I'm quite busy last days :)
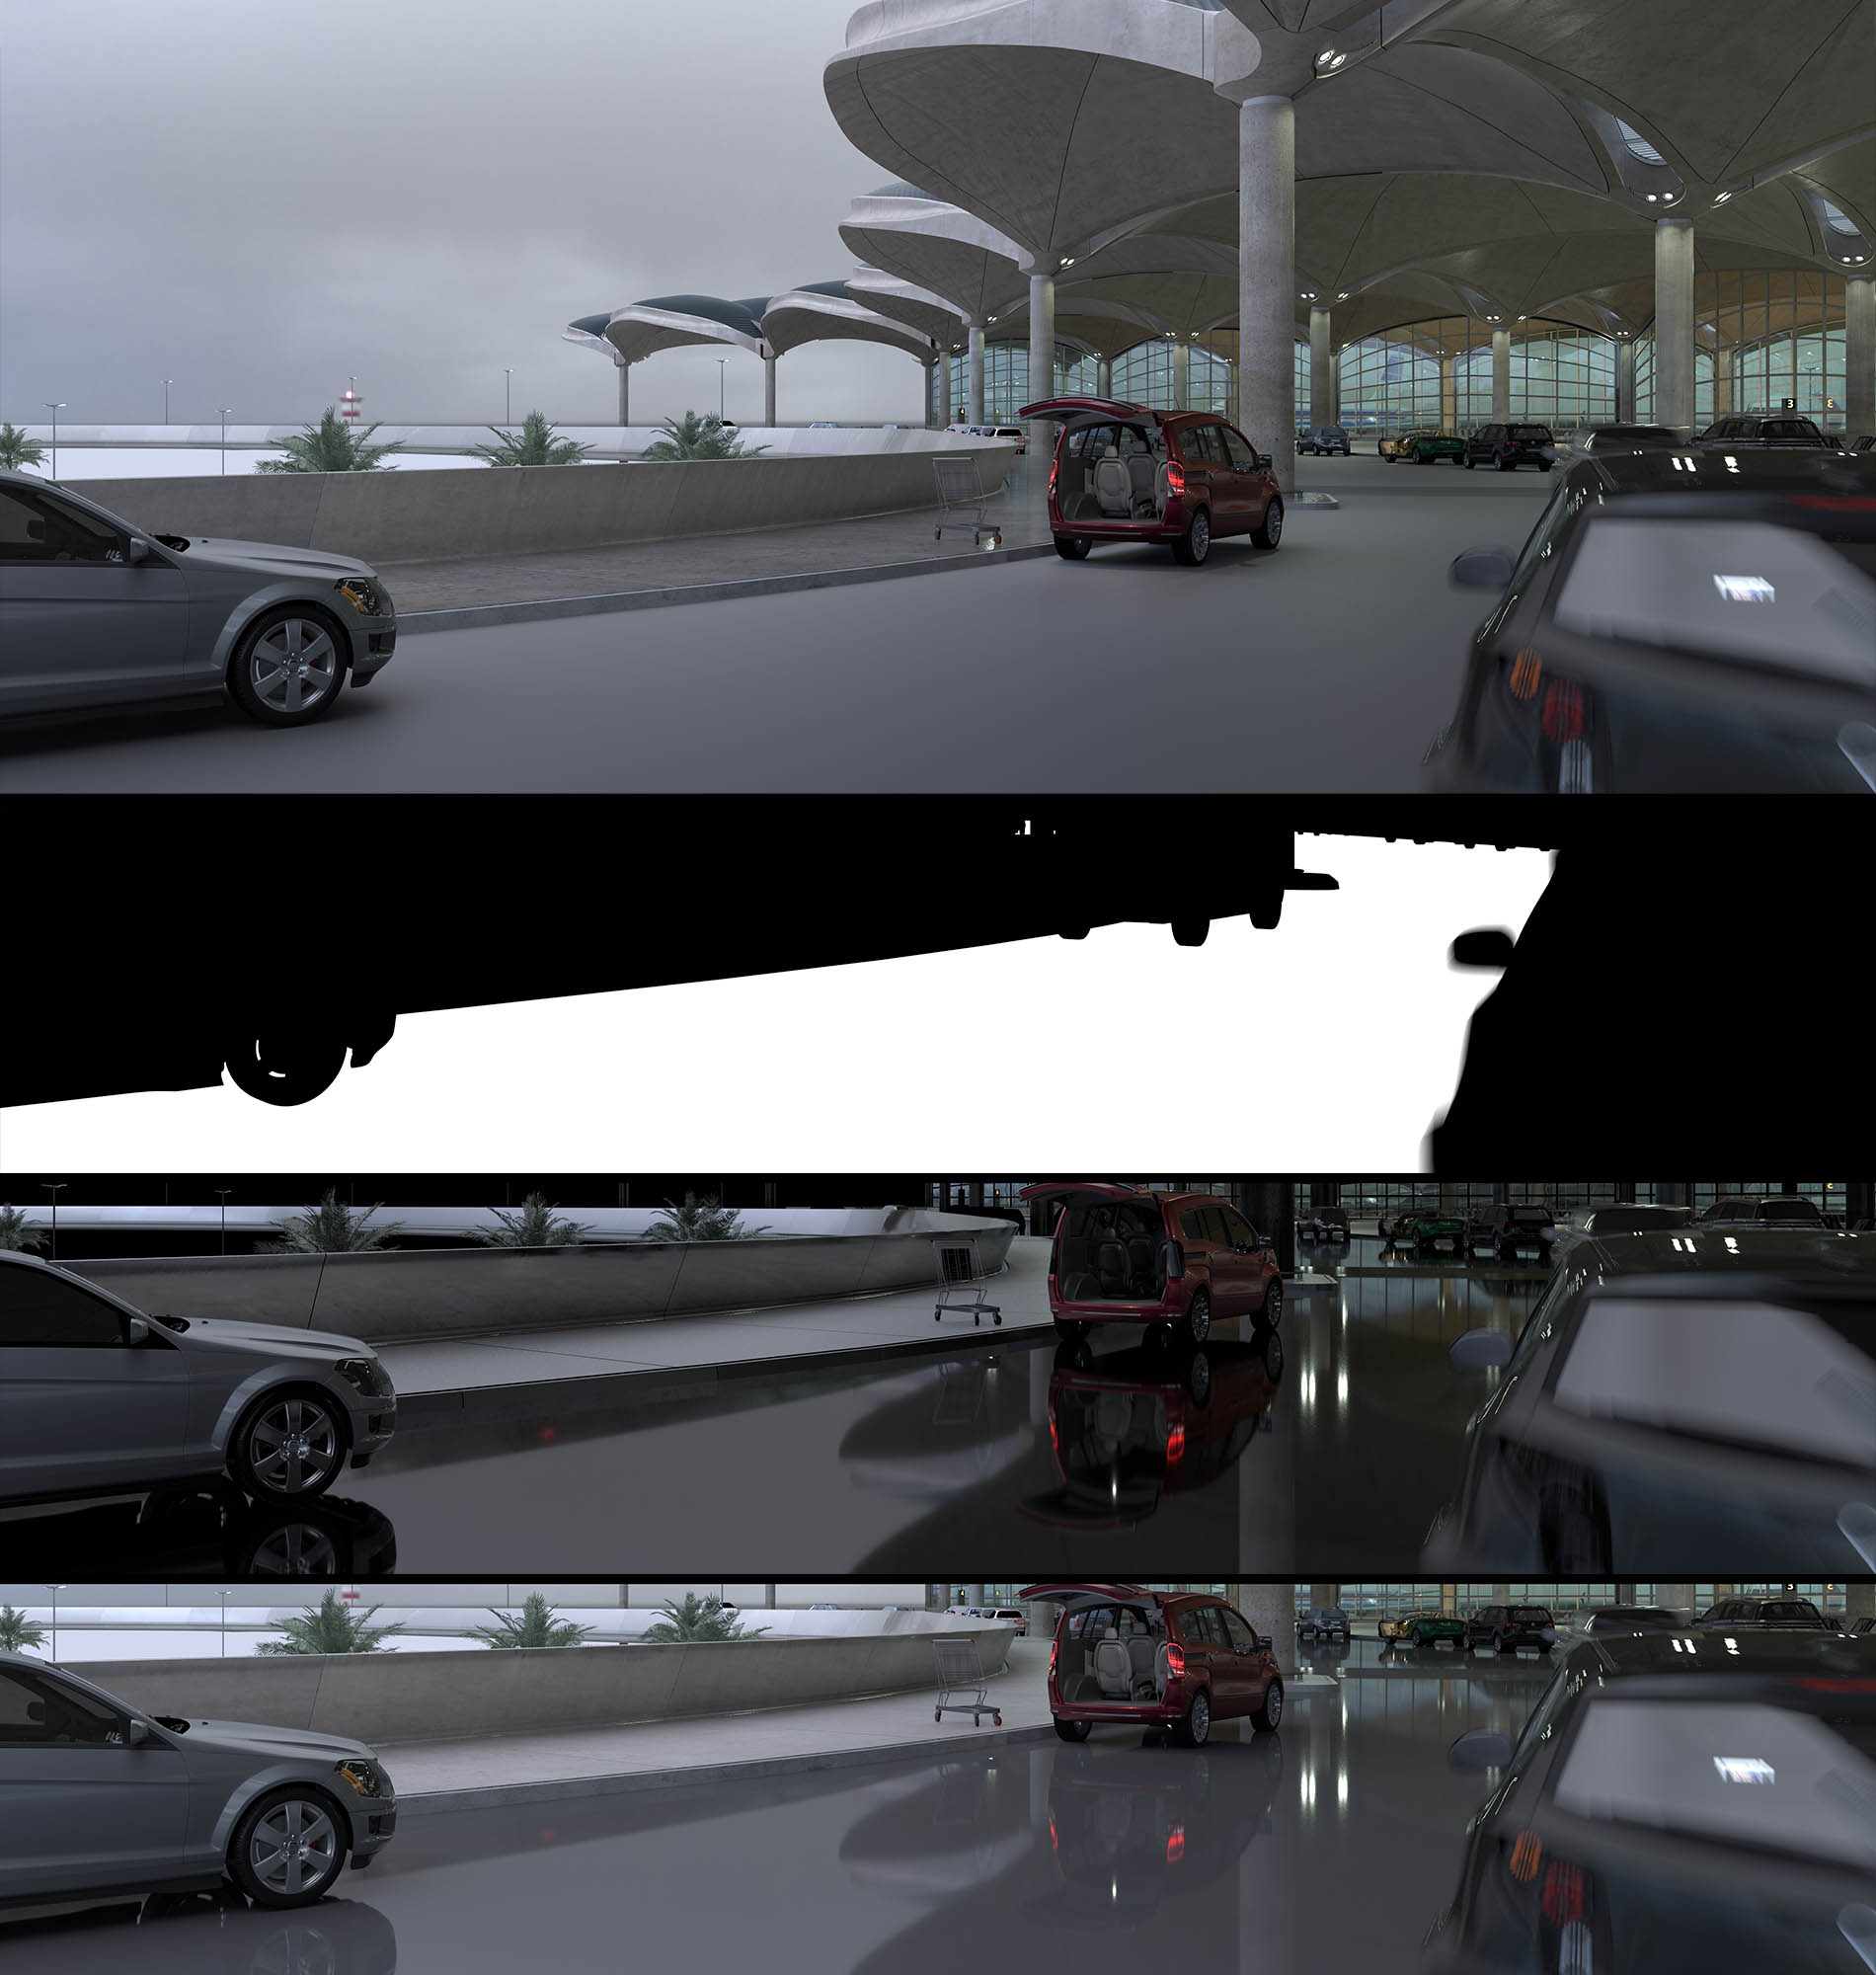
Here is a screen with the road main layers. The main trick is that I rendered two versions of the wet surfaces. One dry ( without textures on the road ) and simple wet road surface and pavement as well. I added id channel for the road of course and used it as a mask in photoshop between dry and wet rendered layers. The additional reflection layer is very important too. With this layer it's possible to better controll reflections effect in postproduction. Strenght of the reflections or even you can blur it in photoshop to change glosiness effect. Finally I painted hand made trails to precisly make a car trails as a wet traces. That's all :)
For the tarmac texture sometimes I use regular tarmac texture in hi resolution and I try to distort it consistent with rendered perspective but sometimes it's better to find nice photo with nice tarmac recorded in perspective also in hi resolution and use it as a something like ready to use part of the road. Ready to use photo is better when the distortion of the regula texture is to big to achieve a nice effect or it's complicated.
Adding the road marking is more easy. I use just road stripes in hi-res and distort it once or in a few steps to achieve final shape.

Layers description from the top:
- dry main render version
- mask for the road
- wet road reflection pass
- wet road render ( I use region render for that )


2016-04-15, 02:10:05
Reply #9

Rhodesy

  • Active Users
  • **
  • Posts: 553
    • View Profile
Thanks for the extra info, very generous. I hadn't appreciated we had working motion blur in the C4D version. Never used it before but its very effective in this image. It helps to give that busy feel.

2016-04-15, 10:25:49
Reply #10

Neb

  • Active Users
  • **
  • Posts: 67
    • View Profile
    • RealPolygons
Thanks you Rhodesy. Very often simple ideas are most effective :) For the object motion blur I just thought to blur two moving cars in postproduction but I made first Corona motion blur test before and it rendered fast and good. Then I decided to make it directly in render. It's the best when we can get right and flexible balance between 2d and 3d technics.

2016-04-15, 16:19:11
Reply #11

dartofang

  • Active Users
  • **
  • Posts: 481
  • @archviztutorial
    • View Profile
congrats on this Neb. :) well done on the post production.

2016-04-16, 12:18:42
Reply #12

Neb

  • Active Users
  • **
  • Posts: 67
    • View Profile
    • RealPolygons

2016-04-20, 18:54:29
Reply #13

anton taf

  • Active Users
  • **
  • Posts: 25
    • View Profile

2016-04-26, 19:45:51
Reply #14

Neb

  • Active Users
  • **
  • Posts: 67
    • View Profile
    • RealPolygons
Thank you ar06614!

Ronen Bekerman published my Making of for This project. Please visit link below and enjoy!

http://www.ronenbekerman.com/making-queen-alia-corona-renderer/