Author Topic: Corona Tips & Tricks  (Read 93825 times)

2015-10-07, 21:03:55

romullus

  • Global Moderator
  • Active Users
  • ****
  • Posts: 8767
  • Let's move this topic, shall we?
    • View Profile
    • My Models
This topic is for collecting various tips and tricks related to Corona. If you have some small secrets that helps you while working with Corona, do not hestitate to share it with comunity. I'm sure everyone will be thankfull for that.

To keep topic nice and tidy here's few simple rules that i ask you to follow before posting something:
  • One advice or technique per post. No need to cram everything you know into single space - it just makes search more difficult.
  • No chatter. Please, do not post something like thanks, cool, didn't know that. Lets keep this topic for useful information only. Posts that contains no value will be deleted.
  • Don't ask for advice or help, we have aprropriate board for that. However, you can ask if there's something unclear in previous posts or you want to add something from yourself. Bear in mind that lengthy discussions may be split into separate topics.

So, lets get started!
I'm not Corona Team member. Everything i say, is my personal opinion only.
My Models | My Videos | My Pictures

2015-10-07, 21:05:35
Reply #1

romullus

  • Global Moderator
  • Active Users
  • ****
  • Posts: 8767
  • Let's move this topic, shall we?
    • View Profile
    • My Models
Take advantage of displacement adaptivity. If you have a map that contains quite large areas of almost pure white or black color, you can clamp those colors with color map curve and Corona's adaptivity algorithm will kick in with full strength, saving you a lot of RAM and possibly render time. See attached pictures for proof.
I'm not Corona Team member. Everything i say, is my personal opinion only.
My Models | My Videos | My Pictures

2015-10-07, 22:58:01
Reply #2

romullus

  • Global Moderator
  • Active Users
  • ****
  • Posts: 8767
  • Let's move this topic, shall we?
    • View Profile
    • My Models
Blur displacement maps. Usually generic textures contains too much high frequency details to be used for displacement. Plug such texture directly into displacement slot and results won't be good (1). One can try to play with color map curve, but this doesn't work well with every map (2), but if one adds a little amount of blurring, wonderful results may be achieved (3). One can always mix blurred texture with original one to bring back a little bit detail (4).
I'm not Corona Team member. Everything i say, is my personal opinion only.
My Models | My Videos | My Pictures

2015-10-07, 23:05:02
Reply #3

romullus

  • Global Moderator
  • Active Users
  • ****
  • Posts: 8767
  • Let's move this topic, shall we?
    • View Profile
    • My Models
Here's small trick with CoronaScatter. Lets say you want to distribute with CScatter some number of instances on certain area as evenly as possible. Usually results are not that good - in some places instances forms clusters, in other places there are large gaps left. That's not exactly what we want. Luckily, there is simple solution. Set scatter count to relatively large number so instances would cover all area without bigger gaps, enable Avoid collisions and adjust spacing until you reach desired density.
I'm not Corona Team member. Everything i say, is my personal opinion only.
My Models | My Videos | My Pictures

2015-10-14, 11:56:22
Reply #4

romullus

  • Global Moderator
  • Active Users
  • ****
  • Posts: 8767
  • Let's move this topic, shall we?
    • View Profile
    • My Models
Since we don't have camera culling option in CoronaScatter yet, we can do it very easy for ourselfs. There's only a few steps required.

1. create distribution plane, give it a few subdivisions (our camera culling won't work very well on a big single polygon), also create objects to be scattered, some camera and CoronaScatter object. Increase scattered instances count and enable avoid collisions. Last step is optional, but without it you may need to constantly adjust scatter count.


2. add camera map (WSM) modifier to distribution plane, click pick camera button and choose your camera. You can change mapping channel if needed or leave it at default.


3. open material editor and create gradient ramp map, set it's mapping channel to same as in camera map modifier, disable U and V tiling and set all flag's colours to white.


4. assign previously created gradient ramp to CoronaScatter's density slot. Voila! We have perfectly working camera culling now.


Now you can play with gradient ramp to further improve camera culling funcionality. Try to change gradient type to box and set one of the flags to black - you will get nice fallof in instances density. If you need to extend camera culling beyond image borders, decrease gradient ramp tiling to 0.9 or any other value.
I'm not Corona Team member. Everything i say, is my personal opinion only.
My Models | My Videos | My Pictures

2015-11-19, 13:01:02
Reply #5

3dwannab

  • Active Users
  • **
  • Posts: 362
    • View Profile
Instead of creating two separate normal maps like in this fantastic thread where Juraj wanted to create a vegetation shader with both front and back side normals to give better results.

Instead of that you can use the generated normal map in the back map slot and for the front map an inverted version. See screen-shot attached.  Simply check all the flips (X and Y) and its the same result as having an inverted version. :]

Jurajs Veg thread.
https://forum.corona-renderer.com/index.php/topic,9837.0.html

He also speaks of how he created the normal maps here also.


2015-11-29, 16:15:24
Reply #6

romullus

  • Global Moderator
  • Active Users
  • ****
  • Posts: 8767
  • Let's move this topic, shall we?
    • View Profile
    • My Models
Corona doesn't have toon shader yet, but it doesn't have to stop us from trying to hack one :] This trick is more based on geometry, rather than on materials, so it may be impractical in most situations, but sometimes it can be useful anyway. BTW, i'm not an author of this technique, i just adapted it to Corona. So let's get started.

Take an object to which you want apply toon shader and make a copy or reference of it, but do not make instance. Let's call it ink object for convenience. Make sure that it always shares same transformations with original. Link or group a pair to be safe. Apply Push modifier to ink object and set push value to some small number. This will control ink line width. You can always adjust it later if needed. Now add Normal modifier and make sure that flip normals is checked. This step is optional, but it will make easier to select original object in viewport. Additionally you can add noise modifier, to break ink outline a little bit and make it more interesting. And it's good idea to turn on backface culling via object properties, for a visual representation in viewport. That's it geometry preparation is complete. You can copy those modifiers and instance them on other objects if needed.

Now, for materials. Original object may have whatever material you want, no restrictions here. Ink object has to be assigned with following material: create CoronaRaySwitchMtl, into all but global illumination slots plug instanced CoronaMtl, set diffuse, reflection and refraction slots of that material to 0, 0, 0 and plug CoronaFrontBack map into opacity slot, set front to white and back to black (or vice versa if you didn't add normal modifier to ink object).

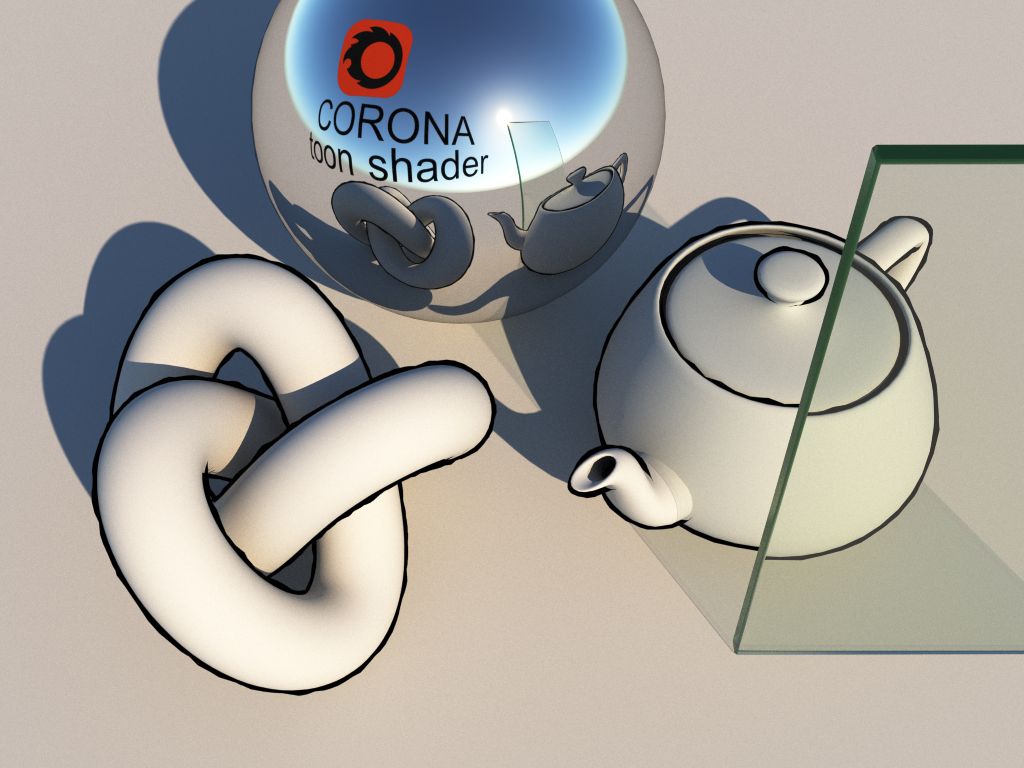
That's it, you're ready to render Corona toon! Have fun!

I'm not Corona Team member. Everything i say, is my personal opinion only.
My Models | My Videos | My Pictures

2015-12-22, 17:00:30
Reply #7

maru

  • Corona Team
  • Active Users
  • ****
  • Posts: 12690
  • Marcin
    • View Profile
You can put rounded edges map in diffuse (or other slots) to see what it does.
Marcin Miodek | chaos-corona.com
3D Support Team Lead - Corona | contact us

2015-12-22, 17:11:24
Reply #8

maru

  • Corona Team
  • Active Users
  • ****
  • Posts: 12690
  • Marcin
    • View Profile
You can use global volume mtl to simulate having camera under water surface.
-Create refractive material with ior@1,33 and set it as global volume mtl
-Create water surface - add a plane and assign to it a refractive material with ior@1,0 (air)
-You can then add air bubbles with the same material as the water surface
Marcin Miodek | chaos-corona.com
3D Support Team Lead - Corona | contact us

2015-12-26, 20:13:31
Reply #9

FrostKiwi

  • Active Users
  • **
  • Posts: 686
    • View Profile
    • YouTube
3dsMax Tip, but relevant if you don't have a SSD.

Remove MentalRay and Quicksilver renderers to speedup 3dsMax startup:
In your 3dsMax folder: Cut out "NVIDIA" folder and paste it somewhere as a backup. (contains all mentalray libraries)
edit: in older 3dsmax versions the folder is called mentalray (pre 2015)
In your 3dsmax\stdplugs folder: Cut out the following files and saves somewhere as backup.
Code: [Select]
mentalray.dlz
mentalray_plugins.dlo
mrMaterial.dlt
mrShaders.dlt
QuicksilverRenderer.dlr
rendvue.dlr
This removes MentalRay, Quicksilver and vue file renderer (Renderer select option) and will prevent the MentalRay libraries from loading, speeding up startup times.
« Last Edit: 2016-01-04, 21:07:44 by SairesArt »
I'm 🐥 not 🥝, pls don't eat me ( ;  ;   )

2016-01-15, 17:54:05
Reply #10

maru

  • Corona Team
  • Active Users
  • ****
  • Posts: 12690
  • Marcin
    • View Profile
Marcin Miodek | chaos-corona.com
3D Support Team Lead - Corona | contact us

2016-06-28, 16:46:35
Reply #11

maru

  • Corona Team
  • Active Users
  • ****
  • Posts: 12690
  • Marcin
    • View Profile
How to make "little planet" effect.

1. Grab a scene and render a spherical pano (Corona Camera mod on top of your camera > spherical projection), it has to be a square render
2. Open the render in PS, go to Filter > Distort > Polar Coordinates
3. Set the mode to "Rectangular to Polar" and press ok
4. Voila!
Marcin Miodek | chaos-corona.com
3D Support Team Lead - Corona | contact us

2016-07-15, 10:44:38
Reply #12

romullus

  • Global Moderator
  • Active Users
  • ****
  • Posts: 8767
  • Let's move this topic, shall we?
    • View Profile
    • My Models
Next trick originally was posted by Frood.

If you want to know in which Corona version max file was saved, you can find it by pasting following line into maxscript listener window:

Code: [Select]
print (fileProperties.getItems "Render Data")
It will print you needed information.

Alternatively, you can write macroscript for more convenient use. Here's how to do that:

For quick acces I ended up with a macro script for my toolbar as one-click solution. If anyone needs it: Paste this into the maxscript listener window, select all lines and drag it to some toolbar, done.

Code: [Select]
for i=1 to (fileProperties.getItems "Render Data").count as integer do (
if ((findstring (fileProperties.getItems "Render Data")[i] "Renderer Name") !=undefined) do (
message=(fileProperties.getItems "Render Data")[i]
if (autosave.Enable==true) do (
message+="\r\n\r\nNote: Auto backup is enabled, this information may be no longer valid after first autosave."
)
messageBox message title:"Renderer information of this file:"
)
)


Good Luck
I'm not Corona Team member. Everything i say, is my personal opinion only.
My Models | My Videos | My Pictures

2016-08-20, 02:04:33
Reply #13

denisgo22

  • Active Users
  • **
  • Posts: 700
    • View Profile
Since we don't have camera culling option in CoronaScatter yet, we can do it very easy for ourselfs. There's only a few steps required.

1. create distribution plane, give it a few subdivisions (our camera culling won't work very well on a big single polygon), also create objects to be scattered, some camera and CoronaScatter object. Increase scattered instances count and enable avoid collisions. Last step is optional, but without it you may need to constantly adjust scatter count.


2. add camera map (WSM) modifier to distribution plane, click pick camera button and choose your camera. You can change mapping channel if needed or leave it at default.


3. open material editor and create gradient ramp map, set it's mapping channel to same as in camera map modifier, disable U and V tiling and set all flag's colours to white.


4. assign previously created gradient ramp to CoronaScatter's density slot. Voila! We have perfectly working camera culling now.


Now you can play with gradient ramp to further improve camera culling funcionality. Try to change gradient type to box and set one of the flags to black - you will get nice fallof in instances density. If you need to extend camera culling beyond image borders, decrease gradient ramp tiling to 0.9 or any other value.


good method proves how much the required option /camera culling/ directly in CoronaScatter without using map///It does not allow easy and simple to apply other Density map in CS /Vertex Color,Bitmap and etc/

of course there is the opportunity to play with Corona Mix map for mixing Gradient and Other's map's, but this only greatly complicates the scattering process,not to mention the fact that the every moving of
Camera greatly slows down and gets stuck due to recalculation of CS every time without optimizations which have for example /Forest Pack/ and others scatters system's with Camera Culling option ///
« Last Edit: 2016-08-20, 02:09:47 by denisgo22 »

2016-08-20, 12:38:17
Reply #14

Sintel

  • Active Users
  • **
  • Posts: 37
    • View Profile
thanks very much for that useful tip :))
very ez to play with composite map :))

« Last Edit: 2016-08-20, 15:10:12 by Sintel »

2017-01-11, 16:28:00
Reply #15

maru

  • Corona Team
  • Active Users
  • ****
  • Posts: 12690
  • Marcin
    • View Profile
Quickly toggle lights on/off:

Create a Layered mtl. Leave any material as the base. Add Light mtl as layer 0 material. Add some other material (e.g. standard Corona material with diffuse level 0) as layer 1. Now swap these two layers to toggle the light on/off.
Marcin Miodek | chaos-corona.com
3D Support Team Lead - Corona | contact us

2017-04-21, 11:35:16
Reply #16

maru

  • Corona Team
  • Active Users
  • ****
  • Posts: 12690
  • Marcin
    • View Profile
Not entirely a Corona-only trick, but a neat one anyway, from PG himself!

Marcin Miodek | chaos-corona.com
3D Support Team Lead - Corona | contact us

2019-07-24, 13:16:59
Reply #17

Houssam Eddin Hammoudeh

  • Active Users
  • **
  • Posts: 30
    • View Profile
I try to use AO Texture in Element CTexmap by using a small radios (1.5 cm) and it gives a good results I suppose...


2019-07-25, 14:47:25
Reply #18

maru

  • Corona Team
  • Active Users
  • ****
  • Posts: 12690
  • Marcin
    • View Profile
I try to use AO Texture in Element CTexmap by using a small radios (1.5 cm) and it gives a good results I suppose...
Try increasing ray directionality in your AO map. It should get rid of the "wire" appearance on some objects like the tree trunk.
Marcin Miodek | chaos-corona.com
3D Support Team Lead - Corona | contact us

2021-01-14, 12:27:44
Reply #19

leitecunha

  • Users
  • *
  • Posts: 4
    • View Profile
Hi there, a little tip for game developers. In case anyone tries to use Corona to bake a lightmap, it is possible.
You have to render both these 2 render elements:

Diffuse
Diffuse Color.

The lightmap is just one divided by the other. What you gotta do is put both renders in photoshop, the one with just the Diffuse Color on top of the other. Then, on that top layer (Diffuse Color), change the blending mode to Divide. And that's it. Just merge both, and you have the lightmap, black and white, and even the color spills from other objects.

Note that in any lightmap rendering, you can render them as an HDR or a PNG (or other 8bit format). When rendering in HDR, you can set the intensity of light super high and everything will be correct, no clipping etc. But of course, on the game engine side, rendering HDR maps in realtime is overhead, specially for mobile or VR standalone (Quest).
So it's best to render the elements and save them as PNG, but in this case, first check if the light is not clipping the white values... or the final lightmix in the game engine won't be exactly correct.
One way to check if you're not clipping is to just temporarily remove the diffuse texture and render it with the white color (or lower the white to ~235, because no physical material is capable of reflecting 255, the full white).

And that's it!

2021-07-07, 16:10:05
Reply #20

romullus

  • Global Moderator
  • Active Users
  • ****
  • Posts: 8767
  • Let's move this topic, shall we?
    • View Profile
    • My Models
Did you know that you can use pick object from VFB function on Corona scattered objects and it will pick correct source object and not the scatterer itself. Let's say you scattered bunch of pebbles in a backyard, did a quick test render and noticed that you don't like a shape or colour of one of the pebbles, but struggle to find the offending object in the scene. All you need to do, is to press pick button in Corona VFB and click on rendered pebble that you want to select.
I'm not Corona Team member. Everything i say, is my personal opinion only.
My Models | My Videos | My Pictures

2021-09-02, 13:17:02
Reply #21

GeorgeK

  • Corona Team
  • Active Users
  • ****
  • Posts: 838
  • George
    • View Profile
In case people didn't know this is actually a thing (I didn't), you can assign multiple connected nodes to a new root simply by assigning the output bracket to the root of node connections.  (Thanks Sprayer ;).


« Last Edit: 2021-09-02, 17:20:26 by maru »
George Karampelas | chaos-corona.com
Chaos Corona QA Specialist | contact us

2021-09-02, 13:30:36
Reply #22

sprayer

  • Active Users
  • **
  • Posts: 794
    • View Profile
GeorgeK
You didn't this maybe it because won't work on old max versions? On 2020 it didn't work )

By the way you can drag root just on node not only in root slot if you hard to aim on small zoom level for example menu will appear to choose slot


looks like your gif not working even after downloading.
you need to change forum engine already and attach videos =)

2023-11-02, 22:26:01
Reply #23

Frood

  • Active Users
  • **
  • Posts: 1900
    • View Profile
    • Rakete GmbH
You can use the Corona render stamp to save important information in CXR files along the way, because Corona always stores it in CXRs - even if switched off in the frame buffer settings.

1. Define a render stamp with the information you want to store, for example:

%d | %i | %c / %ct | Passes: %pp | Noise: %pe | Total time: %pt | Corona %bn - %b

2. Render CXRs

3. To read that information later, use exiftool like this against a CXR:

exiftool -s3 -CoronaRenderstamp <filename>


Good Luck


Never underestimate the power of a well placed level one spell.