Show Posts

This section allows you to view all posts made by this member. Note that you can only see posts made in areas you currently have access to.


Topics - Frood

Pages: [1] 2 3
1
If activating "Edit Instances" mode, the following viewport navigation actions execute a selection/deselection of instances when the cursor is above the scatter:

- Zoom
- Pan view
- 2d pan zoom mode

Apparently inherited error: when using a 3D mouse, the selection happens at every movement in the center of the viewport. In this case, you are not even able to use the standard move transform type-in. Using Forest Pro and similar, subobject/instance selection works as it should.


Good Luck


Max 2023/2024, CScatter 2.4/3.0

2
Since there is ChaosScatter with Edge Trimming support now, here is a macroscript to quickly add and remove the ChaosScatterEdgeTrimming map to and from materials. Select a material (or multiple materials) in SME and execute it. If any scene object is selected, the material(s) of all selected objects will get processed instead. Supported materials are Multimaterial, Standardmaterial, CoronaPhysicalMtl and CoronaLegacyMtl.

Assign this script to two different hotkeys, where one hotkey uses the "SHIFT" key as part of the key combination. If "SHIFT" is pressed while invoking the script, "Remove" mode is active.

Example:
Assign this script to "Alt+Ctrl+E" and to "ALT+Ctrl+SHIFT+E". If you then press "Alt+Ctrl+E", "Add" mode is active. If you press "ALT+Ctrl+SHIFT+E", ChaosScatterEdgeTrimming maps will be removed instead.


We will probably not need those EdgeMaps anymore using Corona v10, but until then...


Good Luck


Edit:
Changed description to match version 0.3, attached version 0.3:
Required hotkey modifier key changed from "ALT" to "SHIFT" to trigger remove mode. Restored node selection in SME after removing EdgeTrimming maps. Removed console spam.
Edit:
Attached version 0.4:
Fixed undefined active SME view after starting Max without having SME opened once

3
Sharing a script to update displacement while IR is running. Using this macro/button, the scene is not entirely parsed again as it is now required when changing the view. Useful in heavy scenes.

Corona 7+ required.


Good Luck


4
This is an alternate, (imho) safer way to use different Corona versions, similar to the method described in "Multiloaders".

Let's have a look at the current situation: we have a stable Corona v5 and crispy v6 dailies which may have some glitches making them a bit questionable to use for production. So if you just install a v6 daily to play around with it and even when using an environment variable to point Corona to the extracted stable v5 version (using a batch file) when working with production scenes, there is still something important unresolved:

Q:
What if you use your workstation as DrServer, BB or DL server as well? What if another user logs on and starts Max? All of them would run a daily build instead of the latest stable release. But you still want to play around with the dailies features and don't want to install/uninstall Corona every time, how to solve this?

A:
We will just turn it upside down: the default Corona version will be the stable v5 production release and for experimenting with dailies or testing another (upcoming) version, there will be an exception by batch file until we decide to switch to the next stable version.

How to?

Step 1:
Exactly the same as in the guide linked above, see "Step 1 - Install Corona Renderer". So install Corona v6 or later, a current daily build will do perfectly. Since we still want to use Corona v5 for production, extract Corona v5 using the installer and the "Unpack files" option somewhere onto your disk. In this example it will be extracted to "D:\Data\CoronaLocalDist\Corona_5"

Step 2:
Instead of using a temporary user environment variable to load the stable version, the default will be set using the system environment variable(s). They will point to the extracted Corona v5 globally, making sure that the latter will be loaded unless there are additional measures taken:

a) In windows settings, search for "environment". Choose "Edit the system environment variables":


b) Press "Environment Variables":


c) At the bottom part ("System variables") press "New" and enter variable name and target directory according to your 3ds max version and the location where Corona v5 was extracted. You can conveniently use the "Browse directory" button here:


Step 3:
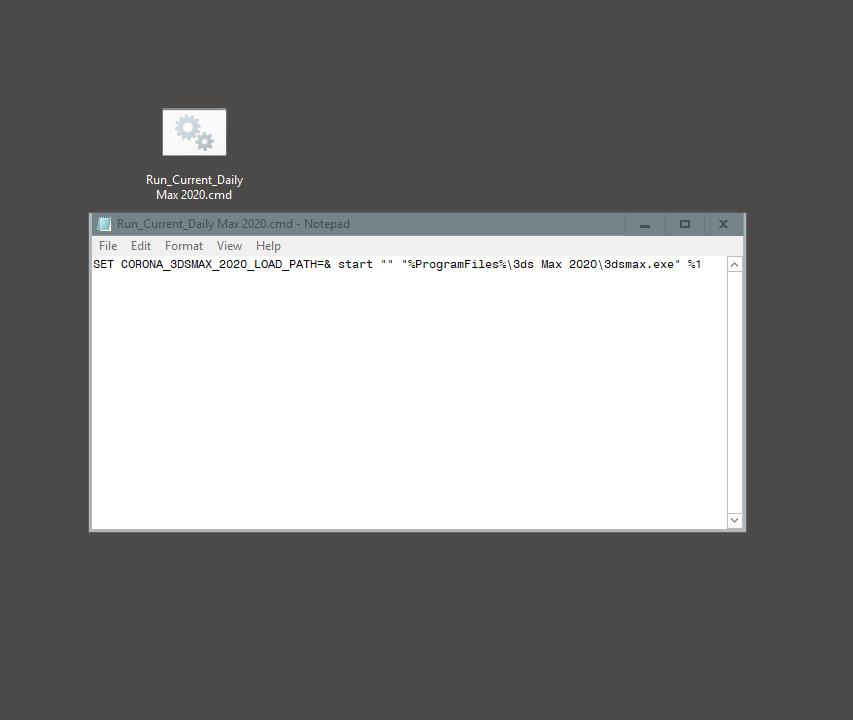
Create a batch file to load the version you like. Right now after setting the system environment variable, it points to Corona v5 for every user account, including the "system user" or others which run servers/services. If we like to use the currently installed daily, the environment variable just needs to be deleted before starting 3ds Max:

Code: [Select]
SET CORONA_3DSMAX_2020_LOAD_PATH=& start "" "%ProgramFiles%\Autodesk\3ds Max 2020\3dsmax.exe" %1
Save this line as e.g. "Run_Current_Daily Max 2020.cmd" somewhere:


Result: The production Corona v5 version is always used by default - for every user and every service. And only if you want to explicitly try the latest installed daily, running the batch will load it.


Good Luck


Edit: updated official documentation link for using Multiloaders
Edit: clarified the need of Corona 6+ to be the installed version at step 1.
Edit: added %1 to batch to be able to use "open with" in windows explorer
Edit: removed space after "=" in batch

5
Pressing TAB or Shift-TAB in the Corona Color Picker is broken, you get random jumps anywhere if ever.


Good Luck


Max 2016 | Corona version: 6 (DailyBuild Jun 18 2020)

6
Meanwhile it's even possible to denoise the "rest" lightmix element (thanks for this!), but the option to denoise the renderstamp is still missing. I know it's not essential but I use the renderstamp do display various information but always struggle with noise - unreadable sometimes. Would be nice if we could finally have that option (see mockup) - waiting for this since years now, maybe in V6? Thanks,


Good Luck


7
Full error text:

An internal error occurred: wxWidgets assertion failure. Please, report this problem to us.
File: C:\Corona\dependencies\src\wxWidgets-3.1.0\src\msw\bitmap.cpp(741)
Function: wxBitmap::DoCreate
Condition: "w > 0 && h > 0"
Message: invalid bitmap size


Repro:

1. Set render size to 1280x6px
2. Render iterative
3. Go to history tab of Corona VFB
4. Press "Store Current VFB"


Good Luck


Corona v5 final & v3.1 | Max2016&2018

8
Currently we only have showVfb(), not even allowing to query the current VFB state. I'd like to

  • be able to query the current state (displayed/hidden/minimized/maximized, maybe even position and size)
  • be able to change above states as far as possible


Getting the current display state (displayed/hidden) would be the most pressing part. Maybe showVfb() could be called without argument and then return the current state as bool (suggesting this only in the hope for a quick solution :)


Good Luck


9
An error caused by the new multiple environment option for lightmix:

Using Render setup -> "Setup LightMix" creates a Light Select Render Element for the environment(s), creatively named

"Environment: <env_map_name>"

The colon is an invalid character for a filename and starting to render fails. Using dash or underscore would solve it.


Good Luck


Max 2016 | Corona v4 RC1

10
More a feature request but I found this is quite limiting using Corona select map.

Repro:

- Create a CoronaMaterial
- Connect a CoronaSelect map into diffuse
- Connect some random map in slot 0
- Activate "show shaded material in viewport" on the CoronaSelect map
- Change any map coordinate parameters like tiling or size

-> No viewport change.

- IR render -> map renders differently (correctly)

Viewport display is correct when activating "show shaded material in viewport" on a connected map in a slot, but when having multiple maps connected and you switch map, you always need to explicitly select a map and activate the viewport display for that map (again). I don't know if this is a general restriction or if it could basically be done.


Good Luck


Max 2016 | DB 19-05-24

11
The standard daylight system is already referred to as "legacy" meanwhile. The sun positioner (since Max2017) is a real improvement, simplifying things a lot. Read more about it here:

https://knowledge.autodesk.com/support/3ds-max/getting-started/caas/CloudHelp/cloudhelp/2019/ENU/3DSMax-Lighting-Shading/files/GUID-53783CF5-7EBF-4E8C-ACC2-BCA5CD9AD8EB-htm.html

Another essential difference to the daylight system is, that we finally got proper max script access to the date values (still cannot belive it but yes!). Here is the MaxScript documentation:

http://help.autodesk.com/view/3DSMAX/2018/ENU/?guid=__files_GUID_6CCF1D3D_772E_4520_A4F6_055C9A51DC72_htm

Reading or setting date/time via script and piping it into Corona renderstamp, a text object or whatever is no problem any more. It's a decades old max issue which is resolved here, finally making it possible to fully automate sun/shadow studies.

Please support it.


Good Luck


12
Repro:

1. Create a CoronaLight
2. Create two boxes
3. Put both boxes into include/exclude list of the CoronaLight
4. Select the CoronaLight (only)
5. Do a "save as" -> "save selected"
6. Open saved file

-> the first object of the include/exclude list was saved along the CoronaLight.


Good Luck


Max2016 | Corona DB v4


13
When submitting a job to Backburner (BB) and activated strip rendering ("Split Scan Lines" ticked in the submission interface), the second pass (assembling the strips) fails if render elements are defined but switched off. The second pass job tries to stitch strips from render elements which are not created.

Repro:

1. Use any test scene (with valid output path for network rendering)
2. Define any render element, e.g. CESSENTIAL_Direct and have "Elements Active" ticked.
3. Submit to BB with "Split Scan Lines" ticked
4. Strips get rendered and...
5. ...stiched by the second pass, very well.

Then:

6. Untick "Elements Active"
7. Submit to BB on any nodes with "Split Scan Lines" ticked again
4. Strips get rendered and...
5. ...the beauty strips get stitched
6. Additionally the second pass tries to find and stitch the CESSENTIAL_Direct strips which are not present
7. Job fails with error loading corresponding strips

May be a consequence of the fix where bake elements (RTT) were not saving until "Elements Active" was ticked. Have not rolled back to test.


Good Luck


Max 2016 | BB Manager 2016.0.0.2150 | BB Server 2018.0.0.3005 | Corona v4 DBs

14
When piping a map through CoronaColorCorrect (CCC) and using it in the bump slot, bump is lost if brightness is left unchanged at default = 0.

Repro:

1. Open scene, open SME
2. Render IR -> bump ok
3. Plug CCC directly into bump slot -> bump gone
4. Pipe CCC output through CoronaBumpConverter (CBC) -> bump there, but less intense
5. Plug CCC directly into bump slot again -> bump gone
6. Change "Brightness" in CCC to any value <>0 -> bump there

And a bonus glitch:

7. Plug CoronaWire map into bump -> bump ok
8. Pipe CoronaWire output through CBC -> bump gone (I guess it's the "Falloff" needed for use as bump)


Good Luck


Max2016 | Corona DB v4

15
To reproduce:

- fresh scene
- create your trusty teapot
- set scene environment to "Use Corona" and white (any environment will do)
- create a CShading_LightSelect element with "Include Environment Light" ticked
- start (undocked) IR
- switch to that CShading_LightSelect element
- move around

-> element gets brighter with every movement.


Good Luck


Pages: [1] 2 3