Show Posts

This section allows you to view all posts made by this member. Note that you can only see posts made in areas you currently have access to.


Topics - maru

Pages: 1 2 3 [4] 5 6 ... 12
46
[Max] Daily Builds / Daily builds version 3
« on: 2018-06-26, 10:54:36 »
Version 3 daily builds discussion.

You can always get the newest daily build in the usual location: [link]

47
Looks like there is some confusion when it comes to the new material library, and more precisely it concerns the materials using either Real World Scale option or the Triplanar map.

Here are the main differences:

-Real World Scale-
  • It is an option enabled in each of the Corona Bitmap nodes in the material editor
  • Is especially useful for materials which are following some specific direction (such as bricks, wood panels)
  • The objects using it must have proper UVW mapping and must have "use real world scale" option enabled (e.g. in the UVW Map modifier)
  • It will make sure that your materials are using the correct scale, but you may experience some stretching in some situations (if the uvws are stretched, then the texture will follow it)
  • It was one of the first and most commonly requested features among the material library users
  • Most materials from the library are using it

-Triplanar Map-
  • Does not require enabling any options in the material editor, modifiers, or the object itself
  • Works best on organic or geometric forms which have a uniform texture (it does not follow any direction - think of dust, random scratches)
  • Invaluable for objects which are hard to unwrap
  • The objects using it do not have to have any kind of UVW mapping - it will work fine even if the UVWs are completely messed up
  • It will make sure that your materials are using the correct scale and will take care of any possible seams or stretching (it won't happen)
  • Some materials from the library are using it

Some examples:

Real World Scale:
-Note that the pattern is following a specific direction
-Works fine on the curvy wall
-Does not really work on the heavily displaced plane and the poop thing


Material setup:


-Typical example: bricks


Triplanar Map:
-Note that the pattern stops following one direction in some places (sphere)
-Does not work too good on repeating patterns like on the wall
-Keeps good scale on the displaced plane and the poop thing


Material setup:


-Typical example: dust, details (rusty metal here, where we don't want the rust pattern to be stretched on the heavily deformed objects - that would not be possible with RWS without proper UVWs)


48
The one which pops up once you press X, you know?


49
Here is a couple of tests I made of the https://letsenhance.io/ tool. It basically lets you upload an image and get a 4x upscaled version after a few minutes of processing time, all thanks to the magic of neural networks.
Currently you can upload just a few images for free (3? 5?), and then the paid version kicks in. You can choose between the "boring" or "magic" upscaling presets. The "magic" one is where the real magic begins. Suddenly textures are magically recovered from the areas which are otherwise blurry (even in the original image), and more details are visible. You basically get an image generated in 4x higher resolution, or using a camera with 4x more mpx.

I think this is really interesting for upscaling photos and renders for print, especially renders, where RAM may be an issue at some point. You can get a pretty much lossless version of your image in 4x the original resolution, which can be then used for printing or display in super high res.


"ori" is a crop of the original image upscaled by 400% in Photoshop using the "automatic" supersampling option
"boring" is the result of using the "boring" preset, then cropped to show the same region
"magic" is the result of using the "magic" preset, then cropped to show the same region

Discuss. I am also curious about your tests!
Note: this tool is not related to Corona in any way, that's why I am writing in the "General CG" category.

I suggest middle mouse button clicking on the thumbnails below to open the examples in tabs one by one.

50
I am looking for users with "rendering stops by itself" problem, meaning that the rendering will stop and denoising will proceed if enabled, regardless of the noise/pass/time limit set, or even if they were all set to 0.
Please let us know in this topic if you have ever experienced this.

51
I need help with:
-explanation what is going on here (technical reason)
-deciding whether this is a bug or expected

Super simple task: you render a bunch of object on a solid background, then you want to open your file in Photoshop (or proper compositing app) and replace the background - for example with an image, or with a different solid color.

So that's a basic case where shadowcatcher in "for compositing" mode makes sense.

Let's set up a basic scene, render it out, and save the result with alpha channel.
Let's save two versions:
1) in .exr format (32 bit, alpha included)
2) .png (24 or 48 bit, it produces same result, alpha included)

We end up with two *similar* looking images.
We open the png version in PS, add a solid layer of whatever color, save.
We open the exr version in PS, add a solid layer of whatever color, save.

We end up with two images with different brightness in shadows/reflections. Why?

Archive with images and scene: https://www.dropbox.com/s/sf99dy0x2prts85/shadowcatcher-darker-shadows-png.zip?dl=0

52
Something is confusing for me, so I decided to start a forum thread to hear opinions of users and explanation from devs, as it seems I am missing something.

Goal: render some geometry from above (in this case a sphere), save the result as a normal map, re-use it to have the same "spherical" shading on a flat surface. Should be pretty simple. Typical workflow for rendering something like a repeating button pattern.

So:
Scene setup for baking normals. The sphere is spherical. Its center is in the center of the ground plane. Camera is above it, orthographic projection:


The real sphere rendered for reference:


Then I render:
-shading normals element
-z-depth element (using camera ranges for min and max values)

Then:
Hide the sphere, leave the flat plane only. Add a new material.
Let's start with displacement using the z-depth rendered from the sphere (black = ground plane, white = top of the sphere):


Everything as expected, great!


Now let's try with normals. Add a Corona Bitmap, select the rendered out normal map, plug it into a Corona Normal map, check "flip green". This is what we get:


Huh? That's definitely not a spherical shape! So here is the 1st question: why?


To fix this, set "strength mult" to 0,5 in the Corona Normal map:


This makes the "curvature" more sphere-like. So here is the 2nd question: why?


I also tried changing gamma and flipping red/green/swapping red and green, but this was the closes I could get.
Any hints appreciated! The idea is simply to get the same "shape" or "curvature" of the original geometry on a normal map.

53
News / Corona Renderer 1.7 for 3ds Max (Hotfix 2) released!
« on: 2017-11-30, 18:34:14 »
Corona Renderer 1.7 for 3ds Max (Hotfix 2) released! Download it here https://corona-renderer.com/download/

Below is the list of changes in this release:

- Fixed black dots and black VFB screen in some cases when using the new experimental light solver

CoronaCamera

- Fixed a crash when changing a tonemapping parameter of a CoronaCamera  that is referenced from another object (for example, ForestPack)
- Fixed camera target moving when changing the shift parameters
- Fixed occasional crashes when using textured lens distortion

DR

- Fixed DR master not accumulating results from slave when one of them supports F16C instruction set and the other does not
- Fixed Hair & Fur simulation .stat file not being loaded correctly on DR slave
- Fixed occasional crashes of slave 3ds Max when DR starts
- Fixed DR issues when using older CPUs

Other

- Fixed Vizpark plugins not being listed as compatible (they were compatible, but were not listed as compatible)
- Updated Corona Converter script to v1.39 (added VRayHairMtl conversion)


54
If you create a Corona Camera in a view other than top (e.g. front, left), it is created in a different way than the native physical or target cameras. If you hold mouse button and drag in the viewport, the target will move towards/away instead of being just projected flat onto the grid.

I may be a feature, but I am not sure about the benefits of it, and I also think it is expected to behave the same way as the standard cameras.

55
[Max] Tutorials & Guides / RAM FAQ
« on: 2017-10-19, 10:26:43 »
(Originally created by Ryuu)

Most of the information provided in this FAQ are a gross over-simplification. Memory handling is a very complex multi-tiered system and we had to err on the side of accuracy to keep the answers as simple as we could.
General Memory Questions
Q1: What’s the difference between virtual memory and physical memory?
Physical memory are the actual DDRx sticks in your machine. Virtual memory is a virtualized view of memory provided by the OS to the applications. You can have more virtual memory than physical memory since it may not actually exist - for example when you have 32 GB RAM, operating system may tell your applications they have 64 GB available. Only when applications use some of the 64 GB, then OS will map that virtual memory into the 32 GB physical memory. The unneeded part will never be mapped.

Each application has its own virtual memory space, so that applications can’t access and change each other’s data. This is the reason why bugs in Corona/3ds Max cannot corrupt other running processes and vice versa.

Applications can only access the virtual memory. They have no direct access to the physical memory itself.

Q2: What’s the difference between memory commit size and working set?
When an application requests a memory allocation from the operating system, the system doesn’t give it a part of the physical memory right away. It instead reserves a portion of the application’s virtual memory space. Application with reserved virtual memory will get actual physical memory when it actually accesses it. Note that physical/virtual memory is allocated in 4 KB units (called pages).

Commit size is the virtual memory space that is reserved by the system as soon as an application requests memory allocation.

Working set is the actual physical memory used by the applications. This number is usually lower than the commit size since most applications allocate more memory than they actually use. The working set size can never be bigger than the actual physical memory size.


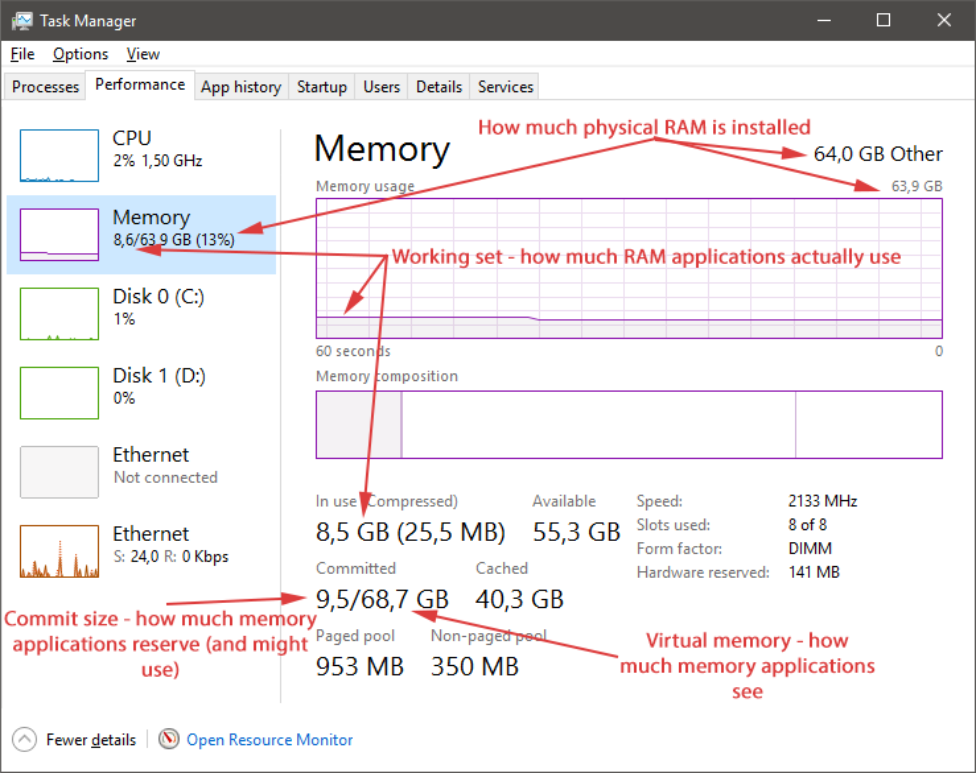
Q3: So, what exactly are the memory numbers displayed in Windows task manager?
The memory usage displayed in the task manager is usually the working set size (i.e. the actual memory used). In most Windows versions you can see extended memory statistics in the task manager, where the commit size is also displayed. See the attached screenshot for detailed description for windows 10 systems.


Q4: Why do applications slow down when system runs out of memory?
When the system runs out of physical memory, it can offload some of the least used memory from RAM to HDD (or SSD or any other storage). This lowers the working set of application(s), but the commit size stays the same - offloaded memory is still mapped to the application’s virtual address space, but when the application tries to access it, the system must first load the memory from HDD into RAM. This process is usually referred to as the “memory paging”.

Since hard-disks (even SSDs) are several orders of magnitude slower than RAM, it takes a lot of time (from the CPUs point of view) to offload or reload the memory when paging is used. This results in a severe application slowdown as well as the well-known HDD rattling sound since the HDD is usually heavily used during this process.

Maximum size of the page file on HDD (and thus maximum amount of virtual memory) can be set in the OS settings. By default Windows manages the file size itself and expands it as necessary. Except for some very specific situations when you really know what you are doing, there is no reason to manually set the page file size.


Q5: Why do applications slow down even when the task manager shows memory not being 100% used?
The reported memory usage is actually a small lie. System usually uses the free memory for data caching.

Whenever an application writes data to the hard-disk, the operating system just stores this data in RAM and then proceeds to actually write the data to the disk later so the application can immediately continue without waiting for the write to complete.

Later versions of Windows also try to detect the most used applications and preload them into memory so that they can start much faster.

All this cached data is usually not included in the task manager as used memory, but still must be accounted for when checking the memory usage for performance reasons because if an application requests additional memory, the system must first free it by writing the cached data on the hard-disk.


Q6: When does Corona emit a “low system memory” warning?
The warning is displayed whenever the system emits a “low system memory” event. We have no control over when exactly this event is emitted. It is Windows that decides that memory is running low and applications should start conserving memory.


Q7: Can’t Corona use hard-disk to offload data when there is not enough RAM?
It can and it actually does (through the system’s memory paging mechanism). Hard-disks are several orders of magnitude slower than RAM so this results in a severe application slowdown. See answer to Q4 for explanation.


Q8: Why Corona sometimes crashes on low memory and sometimes not?
When the system runs out of memory, application memory allocation requests may be denied by the OS. Application code must be specifically written to handle such situation. This often means that much more code must be written for handling such cases and usually the existing code also has to be restructured.

Older parts of Corona were originally written without giving too much thought for handling such “error” cases. Newer or rewritten code like the new displacement was written with out of memory handling in mind. When a memory allocation failure occurs, such code can roll back its changes to the scene data and just inform the user about this situation instead of crashing.

We hope that in the future most of the Corona code will be written like this, but it is not a simple task.

So the crash only occurs when the system denies memory allocations for the part of the code that is not written to handle it. If the memory runs out while in 3ds Max, it will always crash, as 3ds max does not handle low-mem situations at once.


Q9: Why is version X of Corona running fine when out of memory, but version Y slows down/crashes?
Since we are always rewriting and improving old code, different versions of Corona may have different memory access patterns. When the system is out of memory, it begins to page out the least used memory to the hard-disk (see answer to Q4 for details). Most of the slowdown is caused when the application tries to access the paged-out memory and OS has to reload it from HDD. Sometimes it just happens that the paged-out memory is accessed very rarely by the application and so there is no need to reload it. This can be for example some very large texture that is never hit during the rendering.

However many of the out-of-memory situation performance differences can be attributed to the system being in a different state (other applications running or not running) or just to the plain old placebo effect.


Q10: Why is corona running slow/showing warnings/crashing when there are still gigabytes of memory available according to task manager?
Slowdowns may be caused by the system using the free memory for caching various data. In that case the cache must first be flushed to disk before the "free" memory can be given to any application. See answer to Q5 for details.

"Low system memory" warnings are signalled by Corona when it receives a "low system memory" event from the OS. It is completely outside of our control when exactly is this event emitted. See answer to Q6 for details.

The memory usage number displayed in the task manager is the actual amount of memory used by the applications. The applications can however request that the OS reserves them a much larger amount of memory. Most applications do this and Corona is no exception. The system usually has a max limit of the memory it is willing to reserve and when this limit is reached, it will refuse memory allocation requests from the application. Unless the application has additional code to handle such cases, it will simply just crash. See answer to Q8 for details.


Q11: What happens when I run out of physical memory vs. what happens when I run out of virtual memory?
When the system runs out of physical memory, OS starts to page-out parts of the memory to the HDD which results in application slow-downs. See answer to Q4 for details.

When the system runs out of virtual memory, OS will deny any further memory applications. Applications will either handle such situation gracefully or just simply crash. In this case Windows displays a standard error message (“X stopped working” on Windows 10) making it impossible to determine if the crash was actually caused by the system running out of memory. See answer to Q8 for details.


Multiple Physical CPUs
Q12: How is physical memory used in multi-CPU systems?
Each physical CPU has its own memory controller and can have its own physical memory attached. The CPUs can access each other’s physical memory, but with a slightly higher latency than when accessing their local (directly connected) memory.


Q13: What’s the difference between SMP and NUMA memory modes?
Without going into unnecessary details, these modes just influence how the physical memory is accessed by all the CPUs in the system. This affects the system performance, but not the fact that all system CPUs always “see” all the connected RAM.


Q14: Is it better to run Corona on a system with SMP or NUMA memory mode?
Only applications specifically optimized for NUMA will benefit from that mode. Corona is not such application because it would be extremely hard if not impossible to optimize it for NUMA. Use SMP mode for best performance of Corona and most other applications.


Tl;dr: The graph in task manager is not the whole story. It shows the working set : physical memory ratio - actually used memory : physical RAM. There is also the commit size : virtual memory ratio - reserved memory : physical RAM + pagefile. Applications will slow down/crash even when enough physical memory is available in case the virtual memory runs out.

56
[Max] Tutorials & Guides / Setting up a curtain material
« on: 2017-09-13, 09:56:14 »
I was recently asked about setting up fabrics materials, so here is a super short guide:

1. Here is our curtain model with a clay material. It looks pretty boring.


2. The first step is to add a falloff map in Fresnel mode as diffuse color to get the highlights on edges which you can observe on fabrics in real life because they are fuzzy and there is some complex light scattering going on in there. Obviously you can use bitmaps for this (darker + lighter version of the same texture).


3. The next step is adding some translucency, to allow the light to pass through the material. Lower fraction values mean the effect will be more subtle. Color is set to white here, which is wrong.


4. Setting translucency color to something more natural makes the material look much better. Basically if you cut the fabric, this is the color of the inside of it, while the diffuse color is the color of it's surface.


5. If we move the light around, we can see that it now passes through the object, and you can clearly see that in the shadows.


6. Now let's add reflectivity (this is optional). With default values the material looks like it's frozen.


7. So let's lower the glossiness to ~0,2. Remember that virtually all materials in real life have some reflectivity, so if you want your scene to be realistic, this is probably the way to go. Since we are following the PBR guidelines, we can just leave reflection level at 1, and Fresnel IOR at 1,52, and forget about them. If you need different appearance of the reflections, adjust glossiness only.


8. Next step is adding a bump map. This will define the structure of the fabric, and also make it look a bit thicker and heavier. I used a procedural checker map, but using bitmaps would be probably better.


9. If you want your fabric to be transparent, you can adjust opacity. I just slightly decreased it to 0,95 here to see what's behind. You can also use falloff map here to get thicker-looking edges, or use a patterned bitmap.


10. Now if we place the light behind the curtain, we will be able to actually see it, but other effects such as translucency and bump will be visible as well.


Scene in Max 2016 format:
https://forum.corona-renderer.com/index.php?action=dlattach;topic=17423.0;attach=70543


57
Let's share test renders and discuss ui/settings/workflow of the new Skin mtl and SSS settings inside the Corona mtl!

Playing around with a free model from https://threedscans.com/
Scene: https://www.dropbox.com/s/70w3isgpxxi0i9b/maru-skeleton-17-skin.zip?dl=0


58
Quick videos showing how to wire Max bitmap and Corona bitmap with HDRI enviro:
Max bitmap - https://www.dropbox.com/s/kfmhrz9suxd4rnm/wire-max-bitmap.zip?dl=0
Corona bitmap - https://www.dropbox.com/s/v7ip99zn3v5jsq2/wire-corona-bitmap.zip?dl=0
It was recorded in 2k and then downscaled to 1080p, so in case the parameters are not clear, I added them in a form of text files inside the archives. Hope it works fine!

59
Let's share our tests and for fun renders with the new hair shader here!
You can get the newest daily build with hair support here: https://coronarenderer.freshdesk.com/support/solutions/articles/5000570015-daily-builds

Just a few very simple tests for the beginning:

Default settings:


Melanin = 0,25


Melanin = 0,25; pheomelanin = 1


Diffuse color altered:


Glints = 1


Glints = 0


Glossiness = 0,8


Glossiness = 0,2


Glossiness = 0,2; softness = 0,2


Glossiness = 0,2; softness = 0,5


Highlight shift = 0


Highlight shift = 2,5


Highlight shift = 5


Bonus!


60
By popular demand, we have just released a script which allows you to batch edit CXR images with the Corona Image Editor.
Example use: save 100 frames of an animation in .cxr format, perform specific post processing operations and denoising on all of them, and output them in .png format.

The script comes with a help file and an example CXR, which you can experiment with.

The script can be downloaded here: [ LINK ]

Here is also a general guide on the CIE: https://coronarenderer.freshdesk.com/support/solutions/articles/12000030886

Requirements:
-Corona Image Editor installed
-Active Corona Renderer license

Pages: 1 2 3 [4] 5 6 ... 12